Modeling groundwater can be done as a teacher demonstration or students can complete it in small groups.
Vocabulary: groundwater, groundwater flow, precipitation, riverbanks, riverbed, surface water flow
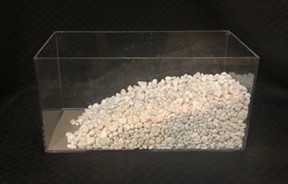
- Obtain an Awesome Aquifer Kit (Awesome Aquifer) or a clear rectangular bin (about 20 cm x 10 cm x 10 cm), gravel, and blue food coloring.
- Pour the gravel on one side of the rectangular bin. Tilt the bin slightly to help make a pile of gravel on one side. The space with no gravel represents a riverbed.
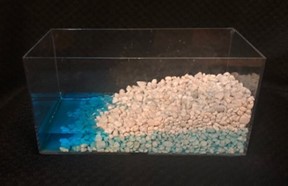
- In a separate cup, mix about ½ cup water with a few drops of blue food coloring.
- When using the model, add the water to the top of the gravel pile and make observations of the pathway the water travels and where it ends up.
Stream Table Setup and Use
These instructions assume the use of a 120 cm x 40 cm (48” x 16”) stream table. The “lower end” of the stream table will have a hole and a threaded metal pipe to which a vinyl hose can be attached. Plastic tablecloths were used to protect the desks. The acrylic hose runs into a bucket on the floor, which is placed on a round tray for extra safety.
It is recommended that teachers tinker with the stream table setup before students use them to figure out what works well. The instructions below worked in the classrooms in which these lessons were tested.
Materials:
- Green Cloth
- Grey Vinyl
- Stream Table
- Sand/Gravel Mix (Utility Sand)
- Tape
- Sawdust
- Threaded Metal Pipe
- Vinyl Tubing
- Bucket
- Tray
- Tablecloth
- Medium Binder Clip
- Permanent Marker
Preparing the Stream Tables:
- Cut a piece of green cloth 35 cm (14”) square. This will model the pervious surface.
- Cut a piece of grey vinyl 35 cm (14”) square. This will model the impervious surface.
- Prop the upper end of the stream table using a piece of board so it is approximately 2 cm (¾”) higher than the lower end of the stream table where the hose attachment is located.
- Lay the green cloth on the stream table so one edge is even with the edge of the upper end of the stream table. Use a medium binder clip to hold the cloth to the edge of the stream table.
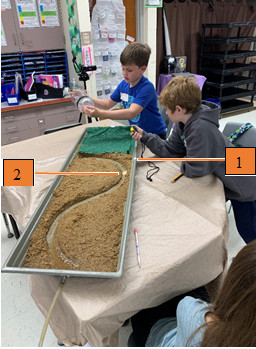
- Mark the lower end of the cloth by putting a piece of tape at the edge of the cloth (see orange marker “1”). Leave the binder clip in place, but flip the cloth back so it is off the stream table.
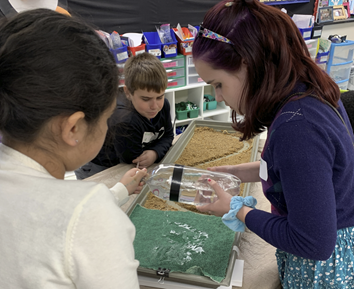
- Put about 2 L of damp sand in the stream table. Distribute the sand so that it is about 2.5 cm (1”) deep from the tape to the lower end of the stream table and is about 4 cm deep from the tape to the upper end of the stream table. Replace the green cloth over the sand.
- Carve a stream channel in the sand below the green cloth. The channel should be about 2.5 cm (1”) wide.
- Note the shape of the channel in the photo. The shape is a backward “S” starting at about where the lower end of the cloth is located.
- The upper leg of the channel angles downward slightly as it runs across the bottom edge of the cloth, then curves to run straight down parallel to the long edge of the stream table for a few centimeters. It then curves toward the opposite side and then back to center where it leads to the hole in the lower end of the stream table.
- The lower part of the channel makes a large sweeping shape in the photo. The lower part of the channel is less significant to the results.
Tip for student use of the Stream Tables:
- It is useful to have a second piece of tape on the long edge of the stream table to indicate where the sawdust will be placed. Before students start the rain, have an adult sprinkle a small pinch of sawdust across the channel at the point where the channel first comes nearest the side of the stream table (see orange marker “2”). The sawdust shows when the water is moving (see lesson plan). Too much sawdust can confuse the results.
- For the impervious surface, leave the green cloth in place. Remove the binder clip. Place the vinyl on the stream table so it covers the green cloth. Replace the binder clip to hold both the vinyl and the green cloth in place.
- To help direct students where to make it rain, draw a black line with permanent marker halfway down the green and grey surfaces. Tell students to make sure the rain falls between the upper edge of the stream table and the black line.
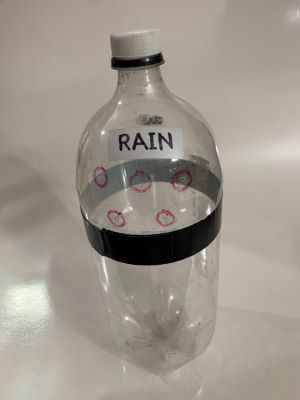
- Start with a clean, empty 2L bottle with the label removed.
- Place a piece of duct tape all the way around the bottle so that the top of the tape is about where the bottle starts to curve. This tape should be about 2 cm wideA “full” rain bottle has water between the top and bottom of the tape. (Note: Using the tape provides a range so that student helpers do not have to be as precise about the fill line).
- Using a 1.6 mm (1/16”) drill bit, drill holes about 2.5 cm (1”) apart. Circle the holes with red permanent marker so students can see them and know where water will come out. The pattern shown in the picture allows duct tape to be used to cover three holes (top row of holes) or two holes (bottom row of holes) to change the number of outlets if intensity of the rain is a variable being tested. In most of the activities the bottle was used with two open holes.
- On the opposite side of the bottle, drill a single hole about 2 cm above the tape. This will be a vent hole so air can enter as water exits. Also, use a red marker to put a ring around this hole so students know that if they tip the bottle that direction, water will come out.
- On a light colored piece of plastic tape, write the word “RAIN” and place it above the holes. This will allow the students to know that the side of the bottle with this label has to be pointed downward for the model rain to fall.
Using the Rain Bottle
- Fill the rain bottle so the water is between the top and bottom of the tape line on the bottle.
- Explain to students that they should not squeeze the bottle. Instead, they should hold the bottle horizontally so it rests in their hands.
- The “Rain” label should be pointed downward. Some students chose to rest the bottle on one hand while holding the cap with the other for stability. In the picture below, two students are working together to hold the bottle.
Return to Streams of Data
This material is based on work supported by the National Science Foundation under Grant Nos. 1906264 and 1906286; Collaborative Research: Streams of Data: Nurturing Data Literacy in Young Science Learners. Any opinions, findings, and conclusions or recommendations expressed in this material are those of the authors and do not necessarily reflect the views of the National Science Foundation.