Teaching and Learning Focus
In the last two investigations students looked at weathering and how rocks break down into smaller pieces over time. In this investigation, students explore erosion, the process by which soil and sediment (the products of weathering) are moved from one location to another. Erosion is caused by gravity, wind, glaciers, and water in the form of ocean waves and currents, streams, and ground water.
In this investigation, students explore river and stream erosion. Precipitation (rain) that falls to the Earth’s surface either soaks into the ground, evaporates, or flows across the land. Water that flows across the land runs downhill. Along the way, it can pick up and carry sediment ranging from fine clay to coarse sand or gravel. As the water runs downhill, it cuts into the soil, forming channels called gullies. When gullies reach a low-lying area, they merge together, forming a larger stream. Streams merge together to form larger streams or rivers. Most sediment carried downhill eventually ends up in a stream and is carried away. In this way, streams affect more of the Earth’s surface than any other agent of erosion. The amount of sediment a stream can carry depends on the speed and size of the stream. The speed of the water in a stream depends on its slope. The steeper the slope, the faster the water moves. Fast-moving or large streams can carry more sediment than slow-moving or small streams.
Abrasion occurs as sediment in a stream collides with rock in and along the stream. Pieces of rock are chipped away and rough edges in rocks and sediments themselves become rounded. The bedrock beneath streams is also eroded by abrasion. Sediment flowing in the water can cut deeply into the bedrock. Over a long time, stream abrasion can cause great changes in the shape of a stream or river and Earth’s surface.
In this investigation, students examine models of river erosion. Groups build different types of river beds by filling stream tables with sand. Each group perches one end of their stream table on some blocks to create a slope. They then pour water into the river bed through a spout. They watch as the water enters the stream bed and begins to carry away sand from the stream edges and the bottom. The sediment is deposited at the end of the stream where the water stops flowing. They see that as sediment is eroded, the shape of the stream changes.
Materials Needed
For each student group:
© AGI
Set up for the coffee can
- stream table or similar container
- fine damp sand, enough to fill the stream table to a depth of 3 cm.
- water reservoir, e.g. a coffee can with a small hole at the bottom and a short rubber tube attached. Seal the hole with clay.
- water
- books or blocks of wood to elevate the stream table
- paper towels
- container for collecting overflow
- stopwatch or watch with second hand
- ruler or meter stick
- paper (e.g. newsprint) to cover desktops
- safety goggles and apron
- Observation sheet
- Stream or River Card
For instructional purposes:
- Images for Setting the Scene
- Images of Flowing Water
- overhead projector and blank transparency sheet, flip chart or white board for recording student responses
Safety
This investigation is generally considered safe to do with students. The sand should be dampened prior to the start of the investigation. Fine sand can be inhaled and is a major irritant. If the sand has not been dampened, provide disposable masks to students. Ensure that students wash their hands thoroughly after handling the sand. Make sure that water is well away from any electrical outlets or equipment. Also, review the investigation for your specific setting, materials, students, and conventional safety precautions.
Setting the Scene
Many students have stood on the bank of a stream or river and watched its water flowing. Many will probably not have seen streams or rivers from a high altitude or elevation. Begin the investigation by showing students the Images for Setting the Scene. Ask them the following:
- Images for Setting the Scene Word Document (4.42 MB)
- Images for Setting the Scene Adobe PDF (171 KB)
- Describe what you see.
- In what ways are these rivers changing the land around them?
Have your students discuss these questions, first in pairs, then groups and then as a whole class. Record their answers on a flipchart that you can refer to throughout the investigation.
Presenting the Investigation Question
After the scene is set, introduce your students to the investigation question:
- How does a river change the land?
Have your students discuss the question in pairs, then in groups, and then as a whole class. Record their answers on a flipchart.
Have your students brainstorm ideas about how this investigation question could be investigated.
- How would you design an experiment that could be used to test the investigation question?
- What materials would you need?
- What would you have to do?
- What would you measure?
- How long would the experiment take?
Tell your students that they will be investigating this question and at the end of their study they will be able to provide reliable answers.
Assessing What Your Students Already Know
Most students will have observed the movement of water in a stream or river, but they may not be aware of the effect of moving stream or river water on the land. Some students may have noticed that water flowing over land will move sediments and debris during a big rain storm, but they do not realize that this same process is continually taking place in rivers and streams. Students who live near major rives may have had some experiences with the erosion of sediment due to flooding. Some students who live near, or have visited, shorelines of an ocean or lake, may have observed erosional features, but not understood how they formed. Here are some initial questions that your students can discuss, in pairs, in groups, and as a whole class:
- During big rainstorms, water often flows across the surface of the land. What does this water do to the soil and rock that it flows over?
- Where does water that flows over the land go?
- What causes some rivers or streams to be brownish in color?
- What does the water flowing in a river or stream do to the rock or soil that surrounds the river?
Have your students share their ideas with the class and record them as a list on the flipchart.
Have students think about what they would like to learn about river or stream erosion. Record their ideas on the flipchart as a list called “Questions we have about how a river changes the land.” This list will provide further insights into what your students know, and also what they would like to know. By the end of the investigation, some of these questions will probably be answered.
Exploring the Concept
© AGI
Set up for the activity
- Explain to students that they will be running models of stream systems. They will create their models in stream tables containing sand. They will pour water into a coffee can. The water will flow through a rubber hose and into the streams. They will observe how the flowing water affects the sand and shapes of the streams.
- Arrange students in groups.
- Provide the materials to each group.
- Instruct students to cover their desktops with paper.
- Assign each group an image from the Stream and River Cards.
Stream and River Cards Word Document (456 KB) |
Stream and River Cards Adobe PDF (350 KB) - Have students use their stream tables and moist sand to build a model of the stream or river system assigned to them.
- Instruct students to draw a picture of their river systems on their observation sheets.
Observation Sheet Word Document (28 KB) | Observation Sheet Adobe PDF (12 KB) - Ask students to measure the widths of their rivers at the top, middle, and ends. Have them record their measurements on their observation sheets.
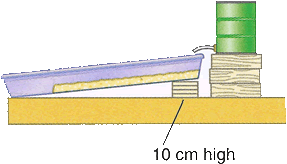
- Have students raise one end of their stream tables to a height of 10 cm. Instruct them to raise the end where the water reservoir will be pouring water into the rivers. Students should use thin wooden blocks or books to raise the stream tables. (see image)
- Have students set up the water reservoir so it will feed into the high end of the stream table. (see image)
- Have students predict what will happen to the sand and the shapes of their streams after water flows through them. Have students record their predictions on their observation sheets.
- Have students fill their water reservoirs and allow the water to flow through their streams.
- Have students record on their Observation Sheets the effect of the flowing water on the sand and shape of the streams.
- Instruct students to measure the widths of the stream beds at both ends and in the middle. This should be recorded on their observation sheets.
- Ask students to develop a conclusion about how the flowing water affected their streams.
- Hold a class discussion about what the students observed. Ask students the following questions. Record their answers on the flipchart.
- Why did the water go down the river bed?
- What happened to the sides of the river bed? Where did the sand go?
- How did the shape of the river change? What caused these changes?
- How did your predictions compare to your results.
- Help students to understand that water will move from higher elevations to lower elevations, due to gravity. In the activity, students tilted the stream bed with books or wood so that gravity could move the water. As the water moved, it transported sand from the stream banks and bottom to the end of the stream table. The process whereby water moves sediment from one location to another is called erosion. Much like their stream models, as a stream continues to flow, it carries more and more sediment away, changing the shape of the stream. In nature, the stream bed may consist of rock. The sediment in a stream collides with this rock, chipping it away and carrying the pieces downstream. Through this process, river beds can cut deeply into the rock below.
Applying Students' Understanding
Show students the Images of Flowing Rivers pictures. Have students answer the following questions related to the pictures:
- Describe how the rivers are changing the land in each picture.
- What evidence would suggest that the land pictured was sculpted by a flowing stream or river?
- Images of Flowing Rivers Word Document (745 KB)
- Images of Flowing Rivers Adobe PDF (257 KB)
Revisiting Investigation Question 5
Complete this investigation by asking your students the following:
- How does a river change the land?
Students should note that rivers or streams carry sediment from one location to another. They should also recognize that as a river flows and erodes sediment, the shape of the river will change.
Digging Deeper
The following passage provides more detailed information related to this investigation that you may choose to explain to your students.
Stream and River Erosion
Erosion always has been, and still is, a natural part of the rock cycle. Without erosion there would be no sediment and no sedimentary rock. Erosion involves the pickup of loose, unconsolidated soil and sediment, or it can involve erosion of solid bedrock.
Streams and rivers erode and transport sediment. They erode bedrock and/or sediment in some locations and deposit sediment in other areas. Moving water, in river and streams, is one of the principal agents in eroding bedrock and sediment and in shaping landforms. Without streams or rivers, there would be few valleys, because streams and rivers form most valleys. The landscape would wear down much more slowly through geologic time. Also, weathering products, such as sand and dirt, would not be carried away to the ocean, so soil thickness would increase in most areas.